No matter if you are using a printer for the first or the 100th time, your Mac can still fail to verify the printer on your network.
So, what to do if your Mac is unable to verify the printer on your network?
If your Mac is unable to verify the printer on your networks, check the internet connection first and try manually connecting the printer. Removing the extra device and print queue can resolve this problem as well. Confirm that the printer driver is up to date. If none of them work, you should factory reset the printer’s settings.
All the methods of solving this issue are described in this article comprehensively. So, keep reading and find out.
What to Do If Mac is Unable to Verify the Printer on Your Network?
There are several methods to fix the network verification problem of the printer on your Mac. You have to try out those methods one by one until you get it fixed. Let’s discuss these methods.
Method 1: Basic Troubleshooting to Fix Unable to Verify the Printer
In the beginning, you have to do some basic troubleshooting to rule out the common reasons behind this problem.
Step 1: Checking the Cable Connections
Check if the power cables are rightly connected to the printer. To be extra sure, remove the cable and put them back in. Also, look for visible damages in the cable.
The cable is prone to wear out with time and the worn can be internal. Try connecting another cable to the printer and check if the problem is lingering. If the new cable solves the problem then the cable was faulty. Otherwise, go to the next step.
Step 2: Turning On and Off the Devices
It might sound silly, but most of the time, turning the devices off and on solved the problem. As the device is rebooted, it solves some underlying problems and starts to work fine.
Shut down both your Mac and the printer. Turn them On again and see if your PC can verify the printer now.
Step 3: Check the Network
If your printer is connected to your WIFI, Make sure the router is on and the internet connection is in good condition. Also, make sure the printer and your PC are within the network range.
Check if your Mac and the printer are connected to the network. You have to link the printer to the Wi-Fi as the way shown below.
Connecting HP printer to Wi-Fi:
- Press the setup button and then press the wireless setting or network button. There should be a sign like this ().
- Tap on the “Wireless Setup Wizard” option.
- Feed your network’s name and password, and you are done.
Sometimes, the Mac address filtering can block the HP printer from connecting. Resolve the filtering issue and try to connect again.
Connecting Epson printer to Wi-Fi:
- Select the “Home” button from the control panel of your Epson printer.
- Choose the “Wi-Fi setup” option and press “OK”
- The setup wizard will appear with another “Ok” pop-up button. Select it.
- Select your network’s name and enter the password. A “Setup Complete” text will show up on the screen.
Connecting Canon printer to Wi-Fi:
- Press the “Home” button on your printer’s touchscreen.
- Press the Wi-Fi button and hold it until the “LAN Wireless setup” option comes up.
- Press the button and press OK.
- Select the network you want to add and feed the password. Press OK.
- You will notice the Wi-Fi light and power light stopped flashing. That indicates the network is connected.
Step 4: Add the Printer Manually.
Sometimes, you may miss the proper setup of the printer on your MAC. Due to this, your Macbook Pro or Macbook Air might not be able to verify the printer on your network.
Follow the steps given below to set up the printer on your Mac properly.
- Click on the Apple® menu located at the top-right corner of your computer’s monitor
- Click on the “System Preferences” option and select “Printers & Scanners”
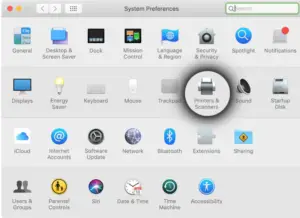
- Click on the + icon to add the printer.
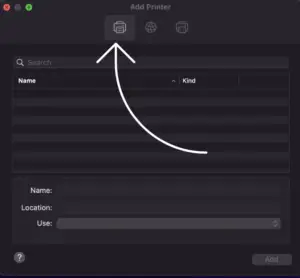
- You can add the printer in 3 different ways.
First, by default, the printer’s name will appear on your Mac screen. Click on the name of the printer.
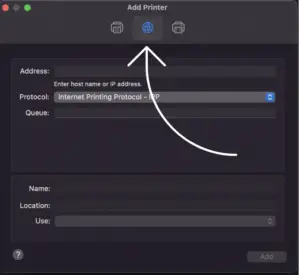
If the printer’s name doesn’t come up, you can find out the IP address of your printer and add it to the list.
If you can’t find out the IP address, you have another option. If your computer’s file-sharing option is open with Windows PCs, you can find out the printer that is also shared by those Windows PC. for this, you have to select the third option shown below.
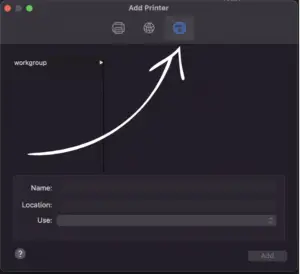
- In the “use” field, select the driver or the software of your printer and click “Add”.
Step 5: Removing And Re-Adding the Printer
If the printer is already added to your Macbook but your Mac still can’t verify it, you should remove the printer from the list. And then re-add the printer.
To remove and re-add the printer, follow these steps:
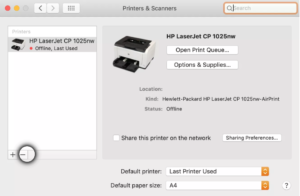
Step 1: Go to the “Printers & Scanners” from the System Preference.
Step 2: Select the printer you are trying to remove from the left-side menu.
Step 3: Select the (-) option and the printer will be removed.
Step 4: Turn the power off of your printer. And if the printer and your computer are connected via a cable, disconnect that as well.
Step 5: Reconnect the cable and turn On the printer. The printer should be automatically added to your computer’s list. If not, add it manually.
If this doesn’t work, proceed to the next method.
Method 2: Removing Extra Devices
If there are multiple printers connected to the computer at once, it can affect the connectivity of the printer you need right now. To do this –
- Go to “Printers & Scanners” and check if there are multiple printers added.
- Select each of the printers. And from the left tab, click on the (-) sign to remove those printers. Keep the only printer you need to connect to right now.
Now, your PC should be able to verify that specific printer. If your PC is still unable to do so, go to the next method.
Method 3: Clearing the Print Queue
If the verifying printer problem starts after you have used the printer for a while, there can be a print queue. The out-of-control queue makes your Mac to be unresponsive to the printer and not able to verify the printer on the network.
Here’s how to check if there is a print queue.
Step 1: Go to the Printers and Scanner from the system preference.
Step 2: From the left tab, choose the printer you are facing a problem with.
Step 3: From the right tab, select the “Open Print Queue” option.
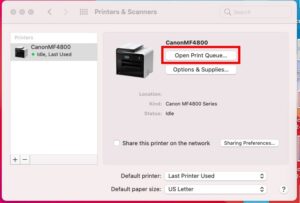
Step 4: Now, you will see all the instructions that are queued for that printer.
If there are too many tasks lined up, you have to clear them up manually. For that, click on the individual tasks and a little cross (x) button will show up. Click on that cross button to delete the task.
Step 5: Sometimes, you may find some tasks to be paused. Insufficient memory to print a particular file can keep the printing task paused. This paused task can also create a queue problem. Click on those tasks, if important, select “Start or “Resume”. Otherwise, delete them.
Now check if the network problem is solved.
Method 4: Updating Printer Driver
If the printer’s driver of your Mac is outdated, your PC will be unable to verify the printer on your network. So you must update the driver of the printer in the following way.
Step 1: Go to the “Managed Software Center” on your PC.
Step 2: If your printer’s driver needs an update, you will see the available update in the list.
Step 3: Click on the “Update All” option in the printer update.

Step 4: keep following the instruction and click “Ok” or “Accept” as required until the update is finished.
You can manually update the driver as well in the following way.
Step 1: Go to the printer’s brand official website. Select your printer’s model name and look for the driver.
Step 2: Download the driver for your Mac.
Step 3: Double-click on the downloaded driver file and follow the pop-up instructions to update the drive.
Method 5: Advanced Setting
In this method, you have to feed the URL of your printer to the advanced option on your Mac. For this method, you have to find out your printer’s URL first. Then, follow the steps described below.
Step 1: Go to the Printers and Scanners menu.
Step 2: On the printer’s panel, you will see a (+) icon on the lower-left side. Click on that button.
Step 3: Click on the gear icon or which is the “Advanced” feature.
Step 4: If you don’t find the “Advanced Button” on the screen, right-click on the top panel (near the Fax, IP, Windows icon). From the search bar, select “Customized Toolbar”. You will now see the “Advanced” button here. Click and hold the button and drag it to the toolbar. And click “Done”.
Step 5: Once you select the advanced option, on the right tab, you will find the “Internet Printing Protocol” button. Select the button.
Step 6: In the “Type” bar, enter the URL of your printer. Click OK and the process is done.
Method 6: Factory Reset the Printer
If none of the methods explained above work, try resetting the printer system from your Mac. It will delete all the data about previous printers and all the previous printers’ presets. Here’s how you have to do it.
Step 1: Select “Printers & Scanners” from the System Preferences.

Step 2: Right-click on the “printer” option on the screen.
Step 3: Select the “Reset Printing System”. Select OK if any confirmation message pops up.
Step 4: Now the system is reset and the printer list will be empty.
Step 5: Re-add the printer you want to connect by clicking the + option.
Now your PC should be able to verify the printer.
Frequently Asked Questions (FAQs):
How do I add a network printer to all computers?
If you connect the network printer to the Wi-Fi, all the computers should automatically recognize the printer. You have to go to the Printers and Scanners setting of your computer and add the printer from the nearby printer’s list.
Are all printers compatible with Mac?
Yes, all modern printers are compatible with Mac. but you have to install the updated driver to let your PC verify the printer. The network printers will automatically be recognized by Mac. However, for a cable printer, you must use a Type – C cable to connect the printer to the PC.
Why is my printer connected but not printing?
If your printer is connected to the PC but still not printing, some paper in your printer might be stuck. Printer queues, outdated drives, and poor networks can also cause this issue. You should also check if there is enough ink on the printer.
Conclusion
Here’s everything you had to know, unable to verify the printer on your network. Try all the methods one by one and hopefully the printer verifying problem will be fixed. If you still can’t solve the problem, you should consult a professional.
That’s all for now. Best of luck with the printer, and have a nice day!