HP Instant Ink cartridges are more durable and contain more ink than conventional ink cartridges. Some of the HP Instant Ink cartridges are bigger than others.
So, How to fix issues with hp instant ink 64/303 compatibility?
HP envy photo 6220, HP envy photo 6230, HP ENVY 6234, HP envy photo 6255, HP envy photo 7130, HP envy photo 7134, HP envy photo 7155, HP envy photo 7830, HP envy photo 7855, HP Tango series and some others HP printer are compatible with Hp Instant Ink 64/303. In some cases, the printer did not recognize the instant ink compatibility. Even though you have a compatible ink cartridge the printer might show error messages.
There are several things you can do to try and resolve the issue:
Make sure the cartridge is installed correctly, Clean the contacts, Restart the printer, Update printer firmware etc.
Do you want to know in detail? Keep reading; you will get there!
Which Models are Compatible With Hp Instant Ink 64/303?
To check if your printer is compatible with HP Instant Ink and which ink cartridges it requires, you can visit the HP Instant Ink website and enter your printer model.
The HP website will provide you with information about which ink cartridges are compatible with your printer and which plans are available for your printer model.
Compatible ink is produced by third-party producers specifically for use in designated printers without infringing on the patents held by the original printer makers. There is a range of packaging options for compatible inks and toners, including sealed plastic wraps and taped plastic wraps.
Hp instant ink 64/303 is compatible with the printer. HP Instant Ink cartridges last longer than standard ink cartridges because they contain more ink. Physically, some HP Instant Ink cartridges are also bigger than others
Bellow Table gives compatible HP Instant Ink 64/303 cartridges Printer. By this product list, someone can easily buy a Compatible Hp instant Ink 64/303 cartridges printer.
Hp Instant Ink 64/303 Compatibility |
| HP ENVY Photo 6200 |
| HP ENVY 6234 |
| HP ENVY Photo 7100 |
| HP ENVY Photo 7800 |
| HP ENVY Photo 7900 |
| HP Tango |
| HP envy photo 6220 |
| HP envy photo 6230 |
| HP envy photo 6255 |
| HP envy photo 7130 |
| HP envy photo 7134 |
| HP envy photo 7155 |
| HP envy photo 7830 |
| HP envy photo 7855 |
For details about Hp instant ink 64/303 compatibility products keep reading the content.
What Error Messages You Might See if There is a Compatibility Issue?
There are several types of errors that might occur when installing a cartridge in your printer, The error message will look like these,
- There will be an error message as “toner is not compatible”.
- The notice “printer cartridge not detected” will appear if the printer is unable to identify the ink.
- low or empty levels of ink might be shown on your screen.
- There can be some errors like “cartridge error”, “HP cartridge locked”, ” Cartridge protection enabled”, and “HP ink cartridge not compatible”.
- There can be some warning messages like, “no cartridge installed”, and “cartridge not recognized”
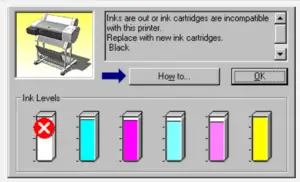
Troubleshooting the cartridge Compatibility issues of the HP Instant Ink printer
When changing or replacing an empty cartridge, one of the most frequent problems experienced by printer owners is the printer not recognizing a new ink or toner cartridge. Here, we attempt to troubleshoot various issues.
These methods also help with other printer problems including printer validation failure.
Problem 1: An internal memory reset is needed
Your printer should use its sensor to recognize whether a new cartridge is replaced or not. After detecting a new cartridge it should reset its internal memory.
Also ensuring that it has full ink and toner levels by displaying it. But in some case, the printer doesn’t recognize a new cartridge correctly and believe that the cartridge was an older one, or no cartridge is currently inserted. To solve this problem follow bellow details:
Solution: Reset the printer
If you face an Insufficient Memory issue, you can follow the below steps to overcome the problem of printer error or failure.
Step 1: Put the old cartridge instead of the new one. Idle your printer for 10 minutes. Don’t do anything with this in the meantime.
Step 2: Now put the new cartridge instead of the old cartridge. This swapping technique solves the problem in maximum cases. Stop here if it will work. However, if you’re still facing the problem keep reading.
Step 3: Remove the new cartridge. Make sure the cartridge is stored in a cool, dry, and secure location.
Step 4: Shut down the printer using its power button
Step 5: Unplug your printer from the wall. The printer will stay in sleep mode if you merely click the power button on the printer control panel, so be sure you execute steps 4 and 5 independently. For the next ten minutes, just let your printer sit like this.
Step 6: Plug your printer into the wall again (Don’t press the power button immediately)
Step 7: Put the new cartridge in again.
Step 8: Press the power button again.
For more knowledge, you can see the video.
Resetting the memory will also help you if you are facing the printer installing error 283 on windows.
Problem 2: The protective strips have not Yet been removed
You forgot to remove the protective covers or plastic strips of the cartridge which are attached to a new cartridge while it packing.
Solution: Remove the protective strips of the new cartridge
Most cartridges have tape that must be removed before installation. We recommend opening each new cartridge and removing the tape over the garbage. When you prepare the cartridge for the printer, a small amount of ink or toner may escape from the cartridge.
Ink Cartridge:
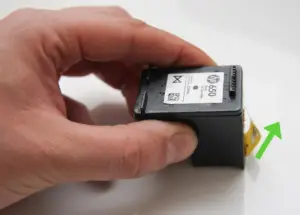
The tape on an ink cartridge covers the cartridge’s vent hole. If you insert the cartridge with the tape still connected, the cartridge will not be able to print.
The tape is normally located on the top of the cartridge and is yellow or orange in color. To remove, carefully peel the tape away from the cartridge. It should simply remove from the cartridge.
We’ve listed two of the most common ink cartridges(integrated print cartridges and individual ink cartridges) below. The printhead is embedded inside an integrated print cartridge. An individual ink cartridge operates with a printhead incorporated inside the printer.
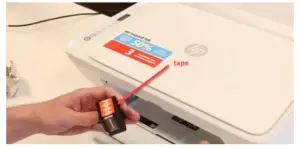
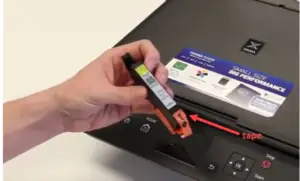
If you want to gather more knowledge, let’s check out the video.
Toner Cartridges:
Most toner cartridges have a strip of sealing tape protruding from the side to protect it during travel. Gently drag the tape out and across the toner towards the dustbin to remove it. When you pull on the tape, you’ll notice it’s a lengthy strip.
Before inserting the toner, be certain that all of the tapes have been removed.
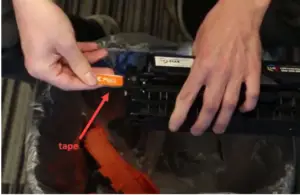
If you want to know more information about this, let’s check out the video.
Problem 3: Dirt or damaged objects can stop data from being read.
Sometimes, the new cartridge has some dirt or metal obstacle, which can stop the printer.
Solution: Clean your cartridges
Depending on the type of cartridge, cleaning methods can be different. Below are the different types of instant ink cartridges types.

As hp instant ink 64/303 is a type C instant ink cartridge. We will explain here the cleaning process of types C instant ink cartridges.
Reinstall the Cartridge:
Take out the offending cartridge and put it back in its corresponding colored slot.
- Activate the printer.
- Open the door so you may access the cartridges.
- Before continuing, wait until the carriage has stopped moving.
- The carriage that was indicated in the error message’s error message should be removed.
Carriages with cartridge latches: After disabling the lock, lift the cartridge to remove it from the slot.

Carriages without cartridge latches: To remove the cartridge from its slot, press down lightly on it.
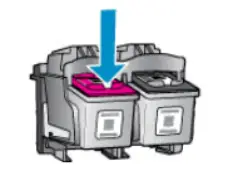
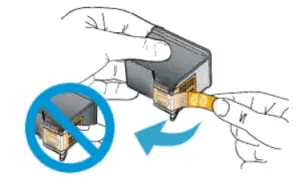
- Verify that the contact’s protective tape has been taken off. (Do not come into contact with the ink nozzles or the copper-colored electrical strip.)
- Replace the cartridge. The black cartridge should be placed in the right slot, while the tri-color cartridge should be placed in the left slot.
- If necessary, follow these steps again with the second cartridge.
- Close the access door to the cartridges.
- Look for an error message.
Ensure that the electrical connections are clean:
Remove any ink or dirt from the cartridge connections and the carriage.
- Activate the printer.
- Open the door to get access to the cartridges, then take one out when the carriage has stopped moving.
- To clean the cartridge’s copper-colored contacts, use a lint-free cloth dampened with distilled water.
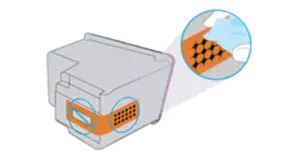
- Spray some distilled water onto a lint-free cloth or swab, then use it to wipe off the electrical connections in the carriage.
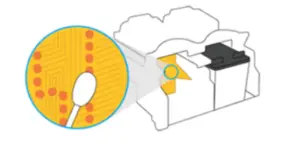
- Before replacing the cartridge into its corresponding color-coded slot, let the contacts 10 minutes to dry.
- Use the other cartridge and follow these directions if the error message instructs you to.
- The door or lid to the cartridge access area must be closed.
- Clean the cartridge and carriage contacts once again if the issue still exists.
Problem 4: HP Cartridge Protection is enabled
Firmware updates for HP printers are not uncommon, and it is possible that an update can “activate cartridge protection,” rendering HP ink cartridges incompatible with printers that do not use the same software.
Cartridge protection may potentially prevent compatibles from working at all on your computer.
Solution: Update Firmware
HP regularly updated its printer firmware version with product issue fixes. Check if there is any available firmware update for your printer from the HP website and install it. There are two types of printer updates,
For non-internet printers:
Step 1: Choose your HP printer from the list of available devices and printers in your settings menu.
Step 2: Locate the cartridge protection tab in the HP toolbox and disable cartridge protection before saving.
For internet-connected printers:
Step 1: Go to your printer’s settings menu and look for your printer’s i.p address.
Step 2: Take note of this and enter it into a browser search bar to be directed to your printer setup page.
Step 3: Disable cartridge protection by clicking settings.
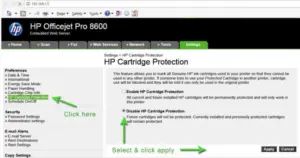
After following the steps, If your network is unable to verify your printer, you may want to contact HP for help. They are valuable for issue analysis and advice expansion.
Problem 4: An Ink cartridge has not been inserted in its slot correctly
If an ink cartridge isn’t fully inserted into its correct slot, the printer won’t recognize it and will display an error message.
All you have to do now is lift your cartridge cover again and double-check each of the inserted cartridges to ensure that they are correctly clicked in, then close the cover and try again.
Broken plastic pieces in toners can occasionally cause the toner to not seat properly in the printer slot. Changing the cartridge should fix the problem.
Solution: Verify the proper cartridge insertion:
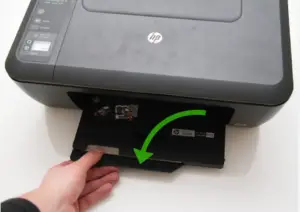
Make sure the cartridge is firmly set in its slot by pressing down on it with your finger. Just do what I say down here,
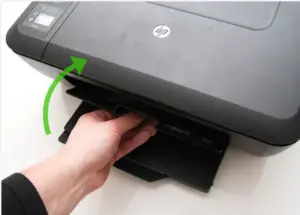
Step 1: Open the ink tray in the printer’s center.
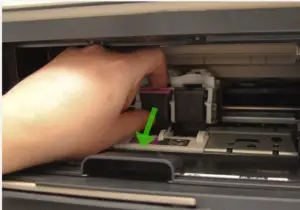
Step 2: To replace the printer’s ink, take out the old cartridges.
- To extract the cartridge, depress the button. By doing this, the ink holder will release it.
- When you feel a click and see the empty ink cartridge pop out, take it out completely.
- For each color, certain HP printers utilize different cartridges. The method is the same regardless of the kind of printer you have. Simply take out each cartridge that has to be changed one at a time.
Step 3: Open up the brand new ink cartridge.
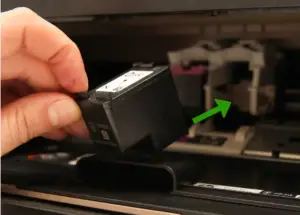
- Remove the new cartridge from its package.
- Your cartridge will have one of two tops, either blue or black unless you have separate cartridges for each color. The cartridge with the blue top contains your colored ink. The cartridge with the black top contains your black ink.
- Take the ink cartridge’s protective tab off. This plastic film shields the cartridge’s ink-dispensing section.
- Keep your hands away from the ink nozzles and the copper-colored surface of the cartridge. If your fingerprints leave a mark, they may clog, fail to print, or disconnect.
Step 4: Insert your new ink cartridges.
- Your cartridge should be inserted into the slot with the ink nozzles facing you.
- Near the ink number label on the top of your ink cartridges, there are two tiny plastic tabs. These tabs need to be nearby. Verify that the nozzle of the ink is pointed away from you.
- The left side is where the color cartridge is placed. New ink cartridges should be inserted.
Step 5: Shut the ink cartridge door.
- When the door is correctly closed, the cartridges will glide back into position.
FAQs:
Hp Instant Ink 64/303 Compatibility
What does Instant Ink compatible mean?
You don’t need to download any additional software to use the subscription service while using an instant Ink ready printer. It will monitor the ink level automatically. then sends you a replacement to ensure that you have the ink or toner you require when you require it.
What are Instant Ink ready Printers?
If your printer automatically interacts with HP to check your ink and toner levels in real-time and then sends you a replacement to ensure that you have the ink or toner you require when you need it, then it’s called an Instant Ink-ready printer.
Difference Between Instant Ink and Standard Ink?
Cartridges for Instant Ink are obviously bigger and can store more ink than those for Regular Ink. Because of this, instant ink lasts longer than regular ink.
Conclusion:
Hp Instant Ink 64/303 Compatibility
Here go all the common problems and solutions with hp instant ink 64/303 compatibility. I hope after reading this article, you can easily troubleshoot any problem you are facing with your hp instant ink 64/303 Cartridge. But during solving the problem careful about the steps, and do the instruction properly as instruction.
My discussion is over now. good luck and keep proper troubleshooting!
Read also: HP Printer Blue Screen Error