Yes, printer’s IP addresses sometimes don’t work in browsers. I have faced the same issue recently with my new printer. And I followed the steps provided in this article, to seek out this issue.
So,why is your Printer IP Address not Loading in Browser?
Your printer IP Address isn’t loading in the browser because there could be connectivity issues, communication issues with the printer control panel, problem with the Internet proxy server settings, and issues with not updating the printer and router firmware properly.
The solutions of these problems are quite simple.We’ve addressed all of these possible reasons and solutions.
Do you want to know more? Keep reading; you will get there!
5 Solutions to Load Your Printer IP Address in Your Browser
I have already mentioned the reasons. The table below lists their solutions.
Have a look!
| Reasons | Quick solution |
| Connectivity issues | Restart your router, printer, and computer |
| Problems with the printer control panel’s communication system | Any communication problems with the printer control panel may be resolved by enabling Web Service using the printer’s EWS. |
| Internet proxy server configuration problems | For networks that use proxy servers, update the Web Services settings in the printer’s EWS using the proxy information. |
| Not updating the printer firmware | From the HP website, download any available firmware updates. |
| Not updating the router firmware | Older router firmware may have an impact on the device’s functionality, security, or ability to connect to the Internet. |
So, that was a quick solution to the Printer IP Address problem. Yet in the next parts, we have a thorough explanation for each of them. Follow along!
Solution 1: Restart the router, printer, and computer
Restarting the computer, printer, and router will usually fix connectivity issues. Before continuing, finish any tasks or downloads that are in process. To find the problem and fix it, take the actions listed below.
Step 1: The router must first be turned off by pushing the power button or removing the power cord.
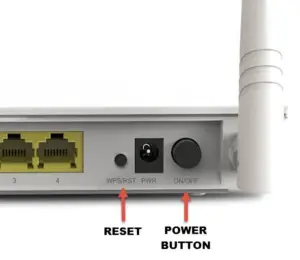
Step 2: In the next step, you need to disconnect the printer from the power cable.
Step 3: Then, shut down your computer after closing any open programs.
Step 4: When the Internet activity light shows a normal connected status, press the power button or reattach the router’s power cord.
Step 5: Connect the printer with the power cable.
Step 6: Turn on the computer.
This might solve your problem and if not then go to the next one.
Solution 2: Enabling Web Service using the printer’s EWS (Embedded Web Server)
Any communication problems with the printer control panel may be resolved by enabling Web Service using the printer’s EWS.
Step 1: First, you need to print a Network Setup Page. There are two methods.
- Control panels for printers with LCDs and text: You can print your page from the Wireless, Network Settings, or Setup menus.
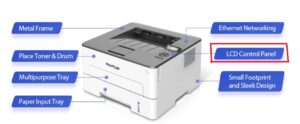
- Printers with simple (buttons-only) control panels: Use the following button combinations on the printer control panel to print the page. On certain printers, press the “Wireless” and “Information” buttons at the same time. On other printers, press the “Wireless” and “Start Copy Black” buttons at the same time.
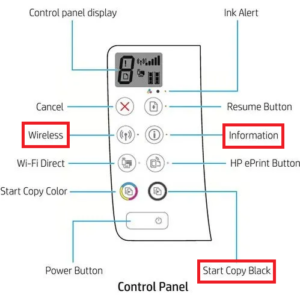
Note: If you are an HP printer user, you can visit “HP Customer Help”. To find more detailed instructions on printing a network setup page, simply input your printer model and then look for the paper headed “print a self-test page.”
Step 2: Find the URL(s) for the embedded web server on the Network Settings Page. Next, carry on with your troubleshooting after reconnecting your printer to the network.
The URL(s) for the embedded web server address can be found in the table below.

Step 3: After that, you need to open a web browser (Internet Explorer, Chrome, Firefox, or Safari) on your computer to enter the URL
Step 4: In the browser’s address field, type the URL for the EWS, and then press Enter. You need to make sure the IP address is typed into the Internet browser’s address field. When you enter a search term into a toolbar search box or search engine, the EWS does not open.
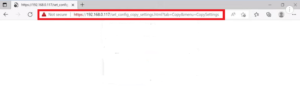
Step 5: If a web security certificate displays, select continue to open the printer homepage.

If a login window appears, for the username, type “admin”.
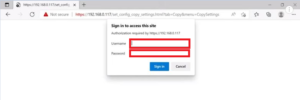
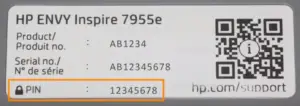
Then type the PIN found on the sticker on the back or below your printer, or the password that the printer administrator has set, for the password.
The printer’s EWS homepage loads, indicating that it is connected to the computer’s network.
Step 6: Click the Web services option on the EWS website.
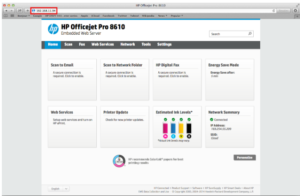
Step 7: Click Proceed, Turn On, or Enable on the Web Services setup page, then adhere to the on-screen directions.
If the problem continues, move on to the next step.
Solution 3: Check the settings for the Internet proxy server
For networks that use proxy servers, you have to update the Web Services settings in the printer’s EWS using the proxy information. This issue can also cause your printer not get verified on the network. Steps to do this are as follows.
Step 1: To proceed, you must Locate the Internet proxy settings. I have the instructions for both Windows and Mac users, so you may choose whichever you need.
For Windows: If you use Windows, you may find the proxy settings for the internet by following the steps below.
- Type “Internet” into the search box. When the results appear, you need to click Internet Settings.
- After that you need to click the Connections tab to choose your network. Next, in the Internet Properties window, choose Settings.
- The proxy settings are displayed in the network settings menu.
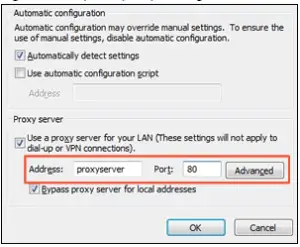
For Mac: If you use a Mac, you may find the proxy settings for the internet by following the steps below.
- First, You need to choose a network under System Preferences. This will assist you in choosing a web proxy.
- After that, you have to select your proxy by clicking the Advanced button, the Proxies tab, and the Network window.
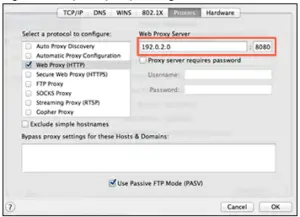
Step 2: For your proxy server connection, note the Address and Port settings.
Step 3: Click the Web Services tab on the EWS, then select Proxy settings.
Step 4: Click Apply after entering the Address and Port information for your proxy server connection.
Step 5: This will activate your Web Services.
Solution 4: Update the Printer Firmware
Through the HP website, you may upgrade your printer’s firmware. The steps are listed below.
Step 1: While the printer is on and linked to the computer, you must select your printer by going to HP Customer Help – Software and Driver Downloads.
Step 2: After that, you can download any available Firmware upgrades.
Step 3: Then install the Firmware upgrades.
This process can also fix any blue screen error issue in your printer.
If you face any problem, you can cite the relevant document Update or Upgrade Printer Firmware for HP Printers for more information.
Solution 5: Update the Router Firmware
The performance, security, or ability of an outdated router to connect to the Internet may all be compromised.
Step 1: To begin, launch a browser, type the router’s IP address into the address box, and then press Enter.
Step 2: Log in to your router’s web-based setup page if necessary.
Step 3: Look for the firmware upgrade option.
Note: For more information, you can check your router’s manual or get in touch with the manufacturer.
Frequently Asked Questions (FAQs)
How do I fix 192.168 1.1 refused to connect?
First, make sure that you’re connected to the right network and that your computer or phone hasn’t joined another network by mistake. If the issue still exists, move on to the following strategy.
Second, If you’re using Wi-Fi, try to connect via a cable connection from a computer.
How do I open printer settings in the browser?
Click the three vertical dots in the upper right corner of Chrome after finding the page you want to print to bring up a drop-down menu with options and settings controls.
To access the printer settings, click “Print.” According to Google Support, pressing “Ctrl+p” on your keyboard will bring up the identical printer settings option.
Is There Any Default IP Address for A Printer?
The printing server’s IP address will almost certainly match the router’s IP address. To find your router’s IP address, use the Start menu Search box to open a command prompt. Enter the command ipconfig. The Default Gateway entry will have the IP address under it.
How do I access the Zebra printer web interface?
First, you need to select View and modify Printer Settings. Then, enter the password 1234. After that, follow the steps mentioned below.
- From a PC connected to the printer’s network, open a browser window.
- Type the IP Address of the printer into the browser’s URL address window.
- The printer’s web page will be displayed.
Conclusion
We hope this solved the problems regarding your Printer IP Address not Loading in Browser.
Here are some extra tips for your printer. You should impose restrictions on printer access, turn off unused protocols, check the firmware level of your printer, and be wary of automatic reporting of printer activity.
These precautions will keep your printer secure and safe.
That’s the end of this article. Let us know what printer topic you want to hear from us about in the future.
Until then, good luck with your printer!
