• Skip to primary navigation
  • Skip to main content
  • Skip to primary sidebar

A Printer Tech

True Reviews on Printer

  • Home
  • Printer
  • Budget
  • Buying Guide

HP OfficeJet 5255 Won’t Print in Color – Troubleshooting Guide

March 31, 2023 By mfarooq012012

Sometimes for various setting problems, HP OfficeJet 5255 does not print in color. If you’re trying to print papers in color then you must learn about the reasons and their solutions. 

Why the HP OfficeJet 5255 won’t print in color?

The HP OfficeJet 5255 won’t print in color could be the possibility for the printer cartridges to be empty, dirty cartridges and printheads, wrong printer settings and disabled color printing. However, if you check ink levels, perform a print head cleaning, solve printer settings based on requirements, enable color printing, update printer drivers and cancel all print jobs could fix your problem. 

You have come to the right site if you’re facing problems like HP printer ink system failure, printer not printing in color, or color problems that you’re wondering how to fix.

HP OfficeJet 5255 Won’t Print in Color: Reasons & Solutions

However, there is a possibility that you could face a validation problem while printing. Incase you face this problem then please visit Printer Validation Failed hp. Now our main concern is to give you a few reasons behind not printing in color. Here are the reasons and how to solve them are instructed. The reasons are similar for Windows and MAC but the solutions are different which have been sectionalized in the solution part for both. 

Reason 1: Hanging to Print

Sometimes it seems that the printer does not print by default. Not working for a long time or a current outage could be the reasons for it.

Solution for:

  • Deactivate the product. 
  • After 30 seconds, disconnect the power cable from the device and reattach it. 
  • Press and hold the Resume button for 10 to 20 seconds to turn the product on.

Reason 2: HP Printer Cartridges are Empty or Running Low

If the color cartridges are empty or running low on ink, the HP OfficeJet 5255 printer might be unable to print in color. This is so that the printer can produce a color printout, which requires that all cartridges have enough ink.

Solution:

Examining ink levels: 

  • Run the printer software on your computer or the HP Smart app to check the ink levels in your cartridges
  • Replace any color cartridges that have low ink levels or that are empty.

Replace the cartridges: 

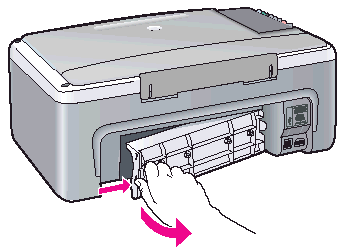
  • Open your cartridge door after turning off your printer. 
  • By applying pressure and drawing them out of their slots, remove the ink cartridges that are low on ink or that are empty. 
  • Take out the new cartridges from their packaging and remove the protective tape. 
  • Make sure the new cartridges click into place when you place them in the appropriate slots.

Testing a page: 

  • To see whether the color ink is printing correctly, turn on your printer and print a test page. 
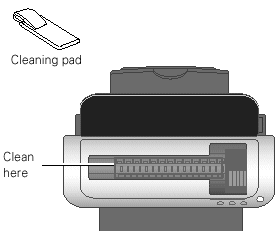
  • Try cleaning the printhead if the problem persists, or get help from HP support if necessary.
HP Printer Cartridges
Source: ebay.com

Your printer should now allow you to print after the aforementioned reset procedure. Reinstall the printer driver if the printer still won’t let you print following the reset procedure. 

You might still get the “Ink Low” message after resetting and installing the device, though. Each Printel ink cartridge has been fully refilled. The cartridge’s chip was unable to be reset, which is why you are reading this message. You can thus disregard the message.

Reason 3: Color Printing is Disabled

After setting up the printer or restarting it, there is a possibility that color print could be disabled by default. And that will refrain you from printing your desired color. You can also connect the printer to your mobile app through Use The HP Smart App.

Solution for Windows:

  • Make sure color printing is enabled by checking the printer’s settings. 
  • To do this, make sure “color” or “auto color” is selected in the printer settings on your computer or mobile device.

Solution for MAC:

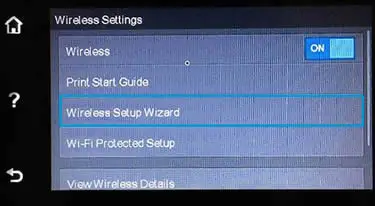
Try setting the HP printer’s wireless settings back to defaults to hopefully resolve the MAC address filtering issue and establish a network connection. Any issue brought on by this security feature will be fixed. 

You have to check on MAC Address Filtering Hp Printer for connecting the printer with your devices rightfully. Then you have to enable the color printing through the below steps.

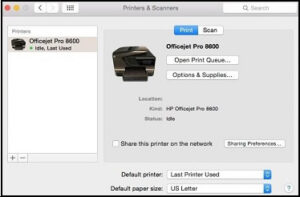
  • On your MAC, select “System Preferences.”
  • Choose “Printers and Scanners” from the menu.
  • From the list of available printers, pick your HP OfficeJet 5255 printer.
  • Click the tab labeled “Options & Supplies”.
  • Choose the Driver tab.
  • Confirm that the “Print Using” section’s “Color” option is chosen.
  • You might need to download and install the most recent driver software from the HP website if “Color” is not an option.
  • To save the changes, click “OK.”
  • To ensure that color printing is functioning properly, try printing a test page or a document with color images.

Reason 4: The Printer Driver is not Working Properly

It can be due to a bug that prevents color printing or because the drivers are incompatible with your current operating system.

Solution for Windows:

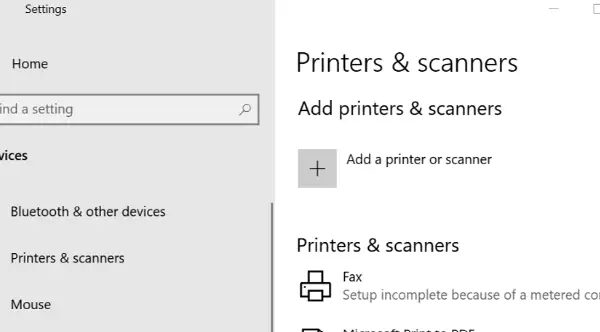
  • In the primary search box located at the bottom left corner of your screen, enter “Devices.”
  • Choose “Devices and Printers” in the list of results.
  • Make right-click on the relevant printer icon.
  • Choose “Printing Preferences” in step four.
  • Modify print preferences and click “OK”

Solution for MAC:

  • After going through MAC Address Filtering Hp Printer to connect your device then you can install the printer drivers using HP Smart App. Refer to the document for help- HP Printers – Install and Use the HP Smart App (Mac).
  • If you face any problem installing the driver then choose System Preferences from the Apple menu, then select Print & Scan or Printers & Scanners.
MAC Address Filtering Hp Printer
Source: h30434.www3.hp.com
  • After ensuring that your printer’s name appears in the Printers list, carry out one of the subsequent actions:
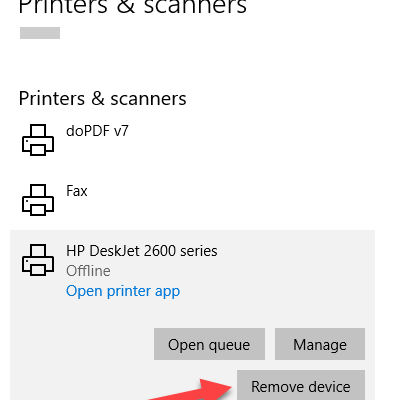
  • If your printer is listed, remove it and add it again to make sure AirPrint is configured on it. Click Add Printer or Scanner, click the plus sign, click the printer name, click the minus sign to delete the printer, click the printer name again, and then move on to the next step.
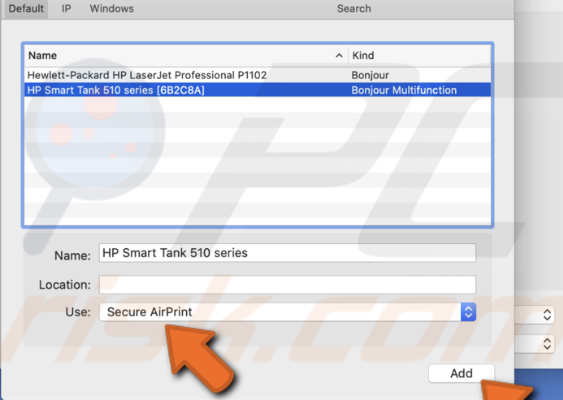
  • If your printer is not listed then click the plus symbol, choose Add Printer or Scanner, select the name of your printer, and then move on to the following step.
  • If your printer is not listed then go to the Frequently Asked Questions on this page to resolve connection issues, try to add the printer again, and then move on to the next step if your printer is not shown in the Add Printer or Scanner window.
  • Verify that Secure AirPrint or AirPrint appears in the Use or Print Using menu before clicking Add.
AirPrint
Source: h30434.www3.hp.com
  • To use the printer’s print and scan functions, be sure to always use the Bonjour Multifunction option. 

[Bonjour multifunction is users may quickly and simply set up a local area network LAN without any configuration thanks to Bonjour, which also means hello in French. It enables the discovery and connection of LAN-based software and hardware. It helps link Apple software and hardware to Windows and Linux systems].

Reason 5: Canceling Previous Documents

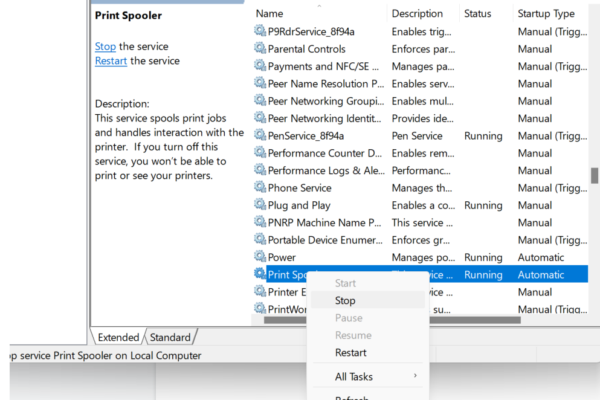
The jammed print queue is another potential reason why your HP printer isn’t printing in color. It could possibly be that the previous setting was in black and white which was about to get printed. Moreover, it is possible for the print queue to become unresponsive and cause problems with the printer’s ability to print. To restore the functionality of your HP printer, you can clear all open print jobs.

Solution for Windows:

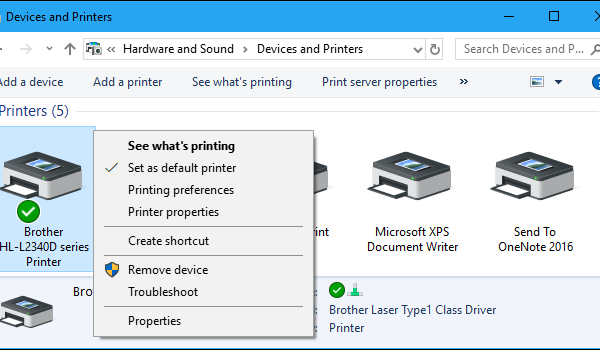
  • In the Control Panel, click Devices and Printers. 
  • In the Printers area, right-click on your HP printer and choose View what’s printing.
  • Choose Open As Administrator from the Printer menu.
  • Reopen the Printer menu. Choose Cancel All Documents this time.
  • Verify what you just did.
  • You have terminated all of your printer’s print jobs. Now see whether it can function regularly.
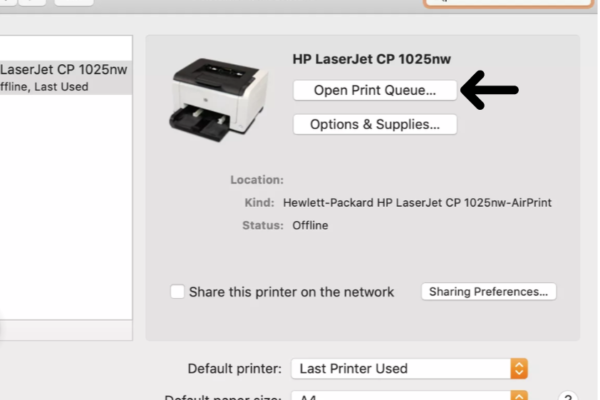
Solution for MAC:

  • Choose Printers under “System Preferences” in the Apple menu.
  • Use the “Open Print Queue” button after selecting the active printer.
  • Choose the required print job(s), cancel it(them), and remove it(them) from the printing queue.

Frequently Asked Questions (FAQs):

Why does my printer use color ink when I only print in black and white?

You might add some color ink when printing in gray to assist you to get the right shading. Black and color ink will be used to prime all of the cartridges whenever they are primed or go through the cartridge cleaning procedure, even if you are only printing with the black cartridge.

Why does my HP printer say low on ink when I just put a new cartridge in?

The original cartridges contain unresectable circuits that track how many pages were printed. As a result, even though the cartridges are not empty, the printer reads the chips and indicates that they are empty. This explains why, despite the ink tank being full, you are still receiving the “ink low” indication.

How do I access HP support?

  • Open HP Support Assistant in Windows by searching for it or by clicking the app’s icon in the taskbar. 
  • Download the most recent version of the program from the HP Support Assistant website if it isn’t already on your PC. 
  • Locate your machine on the My Dashboard page, and then click Updates.

Conclusion

The causes and fixes for HP OfficeJet 5255 Won’t Print in Color are listed here. Please think about the causes progressively and test the solutions. This information will definitely help you with your issue. But, if you don’t feel confident handling this repair yourself, hire a qualified specialist.

Filed Under: Printer

Printer Leaving Roller Marks On Paper: 5 Fixes!

March 7, 2023 By mfarooq012012

Roller marks on paper while you print are an annoying problem that can destroy important documents. This problem usually doesn’t go away if you don’t do something about it. 

So, how to fix the printer leaving roller marks on the paper? 

The most effective way to fix the printer leaving roller marks on oriented paper is to clean the printer roller. You will have to apply different cleaning methods based on the printer’s model. If you live in an area with excess humidity, drying the paper before printing will help. Adjusting the ink density, drying times, and activating the paper abrasion settings also work. 

To grasp these processes in detail, keep reading this article. 

Printer Leaving Roller Marks On The Paper Issue: Physical Fix

In this fixing method, you have to try solving the issue physically either by cleaning the printer roller or drying the paper. Let’s see the fixes. 

Fix 1: Clean the Dirty Printer Rollers 

Cleaning the printer rollers solves the pizza wheel mark problem most of the time. The roller cleaning process can vary with different printer brands. 

Also, when the print roller or print-head sponges are very dirty, it can cause jams in the printer. So, cleaning the printer roller can be a way of fixing the printer jam as well. 

Here are the roller cleaning processes of some popular printer brands.

How to Clean an Epson Printer Roller?

To clean the Epson printer roller, follow the steps below. 

Step 1: Make sure the printer is turned off.

Step 2: The Epson printer comes with a cleaning pad. Dampen the pad with clean water and squeeze it well so that there is no water dripping. 

Step 3: Remove the upper cover of the printer, and wipe the black plastic part of the printer with the dump pad.

Clean an Epson Printer Roller

Step 4: Press and hold the in button and while you are at it, press and hold the printer’s power button. When the paper and ink lights start flashing, you can release the buttons. 

Step 5: Put a sheet of plain paper in the stack and tap on the power button. The printer will feed the paper sheet. For the sheet to be fed through the printer, it will take around three minutes. 

Step 6: During feeding time you have to clean the roller. Take the damp pad again and gently wipe the roller with the pad. To clean the whole roller surface, You can rotate the roller.

Step 7: Now check if the ejected paper has any marks or not. If needed, you can repeat the process again. 

How to Clean an HP Printer Roller?

Here’s how to clean the HP printer rollers. 

Step 1: Turn off the printer and ensure the power cable is unplugged. 

Step 2: Locate the tab on the left side of the printer’s rear access door. Press on the tab and remove the door to expose the printer rollers.

Step 3: Take the microfiber cloth, and dampen it in clean water. Make sure to squeeze out excess water.

Step 4: Gently clean the rollers one by one. Keep rotating the roller to ensure the whole surface is clean. 

Step 5: Let the rollers dry completely and then re-install the rear access door. 

Caution: While cleaning the printer rollers, a cleaning pad or microfiber cloth dampened with only clean water is enough. You should never use any thinner, alcohol, or any other chemical cleaner as it can damage the roller. 

However, you can use cleaning fluid when you clean the external parts of the printer. 

How To Clean The Paper Feed Roller In Canon?

In the Canon printer, you don’t have to clean the printer rollers manually. Rollers can be cleaned through the printer’s programming. Here’s how to do it. 

Step 1: Load some A4-sized or letter-sized paper in the paper tray. For this procedure, only these two types of paper are suitable. Don’t put other papers in the printer. 

Step 2: Press the “Online” button on the printer to put the printer online. 

Step 3: Press the “Utility” button on your printer. It will be signed like () this. 

Step 4: Use the arrow button to locate “Cleaning” from the Utility menu. Press “OK” when you find the option.

Cleaning
Source: Canon

Step 5: Select which sized paper you have used from the cleaning option and press “OK”. 

cleaning option
Source: Canon

Step 6: A confirmation for the execution of the cleaning process will be shown in the menu. Go to “Yes” and press “OK”. 

Step 7: Press the “Online” button again. Now the printer will start feeding the paper and cleaning the roller. 

Note that, you can not cancel the cleaning procedure, so wait with patience until the procedure is complete. 

Also, if you find the print roller to be worn out, you have to replace the printhead roller. The following video might help.

Sometimes, even after cleaning or replacing the print rollers properly, your printer may still leave pizza wheel marks. In this case, you have to try other fixes described below. 

Fix 2: Drying the Paper

If you live in an area with excess humidity, the paper you are using for printing paper absorbs moisture from the air. As a result, the paper gets damped and it takes more time to dry the ink. In this case, getting roller marks is common. 

You can fix this problem by drying out the paper before printing. You can do it in several ways. 

  • Keep the papers under the warm oven fan for around 10 minutes. Make sure the fan is warm, and not hot. The temperature should be around 170 to 200 °F. Then try printing with this paper. 
  • If your oven doesn’t have a warm setting, dry the paper with a hair dryer before you put it on the printer. 
  • Or simply you can put the paper under a fan for 10 to 15 minutes. Make sure to keep a paperweight on them. 

Printer Leaving Roller Marks On The Paper Issue: Settings Fix

You can also try fixing the roller mark on the printed paper problem by changing some settings of the printer. Here are those fixes. 

Fix 1: Adjust The Ink Density & Drying Time

When you use both sides of the paper, sometimes the ink doesn’t get enough time to dry. So, after printing one side, when the paper goes into the printing again, the ink smudges as it goes through the roller. And it leaves roller marks. 

In this case, adjusting the ink density and drying time helps. It will also help with pizza wheel marks on glossy paper as ink on glossy paper requires more time to dry. Here’s what you have to do. 

Adjusting The Density And Drying Time In Canon Printers

Here is the way to adjust the density and the drying time of Canon printers.

Step 1: From the home screen of your printer, select “Menu”. 

Step 2: Choose the “Adjust or Maintenance” option then go to the “Adjust Image Quality” option. 

Step 3: Go to the “Density/Drying Time Adjustment”. 

Step 4: Choose the “Adjust for All Paper Sources” option. The Ink density and drying time should be on ) as default settings. 

Step 5: Choose from Settings 1, 2, or 3 where the Ink density is lesser and drying time is higher than the default settings. Set different densities and times and see if the paper leaves roller marks. You have to do some dry runs in different settings. And then find out the best setting for you by trial and error. You have to select “Apply” once a setting is selected.

Apply
Source: Canon

Adjusting The Density And Drying Time In Brother Printers

Here’s how to adjust the density and the drying time of Brother printers.

Step 1: Select the “Menu” from your Brother printer’s control panel. 

Step 2: Select “Settings”

Step 3: Select “Printer Density” and use the down arrow to reduce density. 

Step 4: Go to the general Setup > Maintenance > Print Setting Options. 

Step 5: Select the “reduce Smudging” option.

Step 6: from the same option select the “Slow Drying Paper” option. Press “OK”. 

Now check if the roller marks on the printed paper problem are solved. 

Fix 2: Activate Preventing Paper Abrasion Settings

When you print on an unusual sheet such as a thicker sheet than 0.3mm or a glossy paper, the print head puts more pressure on the loaded paper. As a result, the roller leaves an impression on the paper. 

In this case, preventing paper abrasion setting will help. This setting will increase the gap between the print roller and the paper sheet. Here’s how to activate this setting. 

How To Activate Prevent Printer Abrasion In Windows 10?

Follow the process below to prevent printer abrasion in Windows 10. 

Step 1: Go to the settings from your PC and find “Printers & Scanners”.

Step 2: Right-click on the printer you are using and click on “Printer Properties”.

Printer Properties
Source: How to Geek

Step 3: Go to “Maintenance and select  “Custom Settings”. 

Step 4: Click on “Prevent Printer Abrasion” and a tick mark on the box next to it will come up. And the setting is done. 

How To Activate Prevent Printer Abrasion On Mac?

Here is the process of preventing printer abrasion on Mac

Step 1: From the Apple menu, go to “System Preferences”. 

Step 2: Select “Print & Fax”.

Step 3: Select the printer you are using and from the right tab click on the “Print Queue” option. 

Step 4: Select the “Utility/ Printer Setup” button. 

Step 5: Select your printer’s name and click on the “Maintenance” option. 

Step 6: From the arrow menu, choose “Custom Settings”.

Custom Settings
Source: Canon

Step 7: click on the small box beside ‘Prevent paper abrasion’ and click send.

Prevent paper abrasion
Source: Canon

Step 8: A confirmation for sending this set to the printer will show up. Click “OK”. 

Step 9: Click “Quick” and the prevent paper abrasion is set. 

Fix 3: Change the Photo Settings

When you print on a high-quality setting, for example, “Photo Setting”, the ink will take longer to dry because it puts on a thicker layer. As a result, when the paper goes through the roller, the ink smudges and creates roller marks, especially on “Glossy Paper”

In this case, it is better to print on “Plain Paper” settings instead of “Photo settings”. 

These fixes should solve the roller marks problem of your printer. 

Frequently Asked Questions (FAQs):

Why Are There Streaks On My Paper When I Print?

If there are streaks on your paper when you print, your printer might be lacking ink or toner. Also, a clogged or dirty printer head or nozzle can cause this problem. In the worst-case scenario, the printer can be malfunctioning and requires professional support. 

Why Is My Printer Banding?

Your printer can keep banding when the injected media of your printer is not compatible with the ink and the printer. Also, incorrect medial settings, misaligned or clogged printheads, and wrong feeding material calibration can cause this problem. 

How To Stop The Paper From Curling When Printing?

To stop the paper from curling while printing, make sure you are using the papers recommended by the manufacturer. You should also dry the paper before putting them into the printer as excess humidity can cause this issue. If nothing works, the printer might have a damaged fuser which needs to be replaced by a professional. 

Conclusion

I hope this article helped you with the Printer Leaving Roller Marks On Paper problem. Print a trial copy after trying the fixes to make sure there are no roller marks. Also, don’t forget to clean your printer regularly. 

That’s all for today. Have a great day!

Filed Under: Printer

Printer Blocked Bad Certificate: 8 Methods To Fix It!

March 7, 2023 By mfarooq012012

Any of the renowned printers including Canon, Epson, and HP can sometimes get blocked due to a bad certificate issue. This problem can occur in android, windows, and even Mac.

So, how to fix the printer blocked bad certificate issue?

To fix the printer block bad certificate issue, repower the printer by pulling off and on the power cable. Resetting the print spooler cache and updating the printer driver. In Mac, resetting the printer system and using Airprint can help. In android, try factory resetting the phone. Using the HP Smart app for HP printers can work. 

Keep reading this article if you have a step-by-step guideline for all of these fixes. 

How To Fix Printer Blocked Bad Certificate Issue

Different devices require different methods to resolve the bad certificate issue. Also, there is no fixed method you can try. You have to go through all the methods gradually until the solution is fixed. 

Method

Feasible for

Repowering The Printer

Android, Windows, Mac

Reset Print Spooler Cache

Android, Windows, Mac

Driver Update

Windows, Mac

Reset the Printer System

Mac

Use AirPrint

Mac

Factory Reset the Phone

Android

Use The HP Smart App

Android & HP Printers

Uninstall & Reinstall The HP Smart App

Android & HP Printers

Method 1: Repowering The Printer. Printer Blocked Bad Certificate Issue

You should start with basic troubleshooting first. Turn off your printer and pull out the power cable. Wait for a minute. After that, install the power cable back and turn on the printer. 

If you are using the printer via smartphone, try powering it off and on. If you are using a PC, restart that as well. Now try to print again. 

Sometimes, rebooting the devices solves many internal problems automatically. That’s why this method can be effective. If not, go to the next method. 

Method 2: Reset Print Spooler Queue

The excessive cache can sometimes block the printer’s activity and cause a bad certificate issue. So, if your printer says a bad certificate, you can try cleaning the print spooler cache and try printing again. 

Here’s how to clean the printer spooler cache in android. 

Step 1: Go to the settings option in your Android. 

Step 2: Scroll down and tap on “Apps” or “Application”.

Apps

Step 3: Choose the “System Apps Settings” or “Show System Apps” option. 

System Apps Settings

Step 4: Scroll down and locate the “Print Spooler”: option. Press on that option. 

Step 5: Go to “Clear data” and choose “ Clear Cache”. And then try printing.

Clear data

To clear the spooler queue in Windows 10 and 11, you can follow one of the two methods described below. 

CLI Method:

Here’s how to perform CLI methods for clearing the spooler queue.

Step 1: Tap the “Start” button

Step 2: On the search bar enter “Command”. 

Step 3: From the “Command Prompt” choose “Run as administrator”. 

Step 4: On the box type “net stop spooler” and hit the “Enter” button. 

Step 5: Now on the box, type del “%systemroot%\System32\spool\printers\* /Q” and press “Enter”. 

Step 6: Again type “net start spooler” then tap “Enter”. The process of clearing the spooler queue is done. You can exit the tab now. 

GUI Method:

If the CLI method doesn’t work on your computer, you can try the GUI method as described below. 

Step 1: Press the Windows+R button together and the “Run” dialogue box will come up. 

Step 2: on the text box, type “services.msc” and hit the “Enter” button.

services.msc

Step 3: Scroll down to locate the “Printer Spooler” option. Right-click on this option and choose “ Stop”.

Printer Spooler

Step 4: While keeping the service window open, again press the Windows+R buttons.

Step 5: On the box, type “%systemroot%\System32\spool\printers\” and click “OK”. 

Step 6: Press the Control+A button together to select all. 

Step 7: Hit the “Delete” button. 

Step 8: Again, right-click on the “Print Spooler” option from the service window and choose “Start”. ‘

To clear the print queue on Mac, follow the steps below. 

Step 1: From the Apple menu, select “System Preference”. 

Step 2: Click on the “Printers” option. 

Step 3: Click on the printer name you are using from the left pane. And click on the “Open Print Queue” option from the right pane.

Open Print Queue

Step 4: Select and cancel all the printer activities one by one. 

Now, the cache is cleared. If clearing the cache doesn’t fix the bad certificate issue, go to the next method. 

Method 3: Driver Update. Printer Blocked Bad Certificate Issue

An outdated driver can cause this bad certificate issue. So, you can update the printer driver and check if the printer works. If you any time face a printer validation error, this method can fix that issue. 

To update the driver, 

  1. Go to your printer’s manufacturer’s website and download the latest version of the driver. Make sure the driver is compatible with your printer’s model. 
  2. Launch the driver and install it.

Method 4: Reset the Printer System. Printer Blocked Bad Certificate Issue

If you are using a Mac to print and facing a bad certificate issue, resetting the printer system can help. Resetting the system can also help when your Mac is unable to verify the printer. 

Here’s how to reset the printer system on Mac. 

Step 1: From the “system Preference” option, go to “Printers & Scanners”. 

Step 2: Right-click on the printer you want to use and select “Reset printing System”. 

Step 3: Click “Reset”. 

Step 4: Go to the finder and from the menu, click on “Go”.

Step 5: Select “Go to Folder” and type “Library”.

Go to Folder

Step 6: Locate the printer folder and open the folder.

Step 7: Click on your printer’s folder and drag it down to trash. 

Step 8: Empty the trash. 

Method 5: Use AirPrint

Bad certificate issues on Mac can be avoided by using AirPrint. AirPrint will let you print documents without having a printer driver. But you have to make sure your printer supports AirPrint. If it does, here’s what you have to do. 

Step 1: Select “Finder” from the menu and choose “Preferences”. 

Step 2: Locate the Macintosh HD icon under the “Show these items on the desktop” title. Click on that icon.

Step 3: Go to the “Library” option and select “Printers”, find the printer’s folder and drag the folder to the trash, and empty the trash folder. 

Step 4: Now, go to “Printers & Scanners”.

Step 5: Select the printer you are using from the left pane. And click on the (-) button below. 

Step 6: connect your printer to the Wi-Fi. Make sure the PC is connected to the same network. 

Step 7: Again go to “printers and Scanners” and select your printer from the list by clicking the (+) button at the bottom of the left pane. 

Step 8: You will see a “Use” option with a selection bar. There should be “Select Secure AirPrint”. If not, from the arrow button, select “Secure AirPrint”. 

Step 9: Click on the “Add” button below.

Secure AirPrint

Method 6: Factory Reset the Phone. Printer Blocked Bad Certificate Issue

If you are using the printer from android, factory resetting the phone can solve the printer-blocking issue. To factory reset the phone, follow the steps below. 

Step 1: Go to the settings option.

Step 2: Locate and select “General & Backup” then tap “Reset”. 

Step 3: Select “Reset the Device”.

Step 4: Select the “confirm” or “Ok” button for confirmation. 

Note that factory resetting will delete all of your phone data. So, you should keep a backup of all the important data on your phone including pictures, videos, contacts, and other documents. 

Method 7: Use The HP Smart App

If you are having this issue with HP printers while trying to print from android, try using the HP Smart app. 

  1. Download the HP Smart app from Google Play. 
  2. Install it on your phone and try printing through this app. 

If you are already using the HP smart app and having this problem, try to uninstall the app. And then reinstall it. This will help update the app to the latest version and fix if there were any bugs in the system. 

If you still can’t solve the issue by trying all these methods, consult with your printer’s dealer. You might have an expired printer certificate that can be updated by the manufacturer. 

Although you will get a message saying the certificate is expired, you should still consider this option. 

FAQs: Printer Blocked Bad Certificate

What Is A Printer Certificate?

A printer certificate is a digital certificate in a printer device’s server. This certificate ensures secure communication between the printer and other devices on a network. Having an SSL certificate for every printer device is mandatory. And it should be signed by a trusted root certificate authority.

How Do I Install A Printer Certificate?

To obtain a printer certificate, you have to create a certificate on the printer or printer device server. And submit it to a trusted certification authority (CA) for processing. The CA will then verify the information and issue a certificate. It is a complicated process, so you should consult the dealer. 

Why Is It Saying My Printer Is Blocked?

The main reason for a printer to be blocked is jammed paper in the printer. The printer can also be blocked if the cartridges are not properly installed and don’t have enough ink or toner. It can also happen due to software problems and expired printer certificates.

Conclusion: Printer Blocked Bad Certificate 

Here goes all the solutions and information on printer blocked bad certificate problems. Hopefully, this article will help you solve the bad certificate issue. 

However, if the certificate is expired, you should obtain a new one immediately to keep your information secured. 

All the best with your printer problem. Goodbye!

Filed Under: Printer

Insufficient Memory To Load Selected Printer Bluebeam: Fixed!

March 7, 2023 By mfarooq012012

When your printer doesn’t have sufficient memory to perform the postscript print job from Bluebeam, it can show an insufficient memory message. This problem can happen in some printers including Kyocera, Lexmark, Brother, HP, Dataproducts,  Tektronix, and Okidata. 

So, how to fix the insufficient memory to load the selected printer Bluebeam error? 

To resolve the Bluebeam insufficient memory error, the most effective solution is to change the Truetype Font. It can be done through your printer’s advanced option. Resetting the printer, uninstalling & reinstalling the printer’s drive, and changing the printer driver can also solve this insufficient memory problem. 

Don’t go yet. Keep reading this article and get step-by-step guidelines for all these solutions. 

How To Fix Insufficient Memory To Load Selected Printer Bluebeam?

There are four methods you can try to resolve the Bluebeam insufficient memory issue while using the printer. Try them one by one until the problem is fixed. 

Method 1: Changing The Truetype Font

If you are unable to print from Bluebeam, changing the Truetype font is the most effective way to fix it. Here’s the process of changing the Truetype font. 

Step 1: Press the windows key and the R button on your keyboard simultaneously. 

Step 2: On the text bar, type “Control” and press enter. The control panel will be opened. 

Step 3: Select the “Hardware & Sound” option. 

Step 4: Select the “Devices & Printer” option. 

Step 5: Target the “Printer” button and right-click on it and select “Properties”. 

Step 6: Select the “Printing preference” option. 

Step 7: Choose the “Layout” option and choose “Advanced”. 

Step 8: Open the “PostScript Options” by double-clicking on it. 

Step 9: Select the “TrueType Font Download Options”. 

Step 10: In the options box, you will see several options including Outline, Automatic, or Bitmap. Choose the “Automatic” option.

Step 11: If the Automatic is already selected choose any of the other two options. 

Step 12: Click “Save” and close all tabs. 

This should solve your Bluebeam problem. If not, there are some other methods you can try.

Method 2: Resetting The Printer. Insufficient memory to load selected printer Bluebeam

Bluebeam insufficient memory to load printers can also be solved by factory resetting the printer.

How to reset the HP Printer?

Remember, HP factory reset and cold reset are different things. We are going to perform the factory reset here. 

Step 1: keep swiping the control panel of the printer until you locate the setup menu.

Step 2: Press on the “setup” icon

Step 3: keep scrolling until you find the “service” menu. 

Step 4: Keep scrolling again, find and select “Restore defaults”. 

Step 5: press “Ok” to confirm and the reset will be done. 

How to reset the Epson printer? 

Step 1: Press the “Home” button signed as a small home on the control panel of the Epson printer. 

Step 2: Locate the “Setup Menu” by swiping menus with the navigation button. Click “OK”

Step 3: Again keep swiping the options by using the navigation key until you find the “Restore Default Setting” button. 

Step 4: There are several options including Wi-Fi/Network Settings, Scan Settings, Copy Settings, and clear all data. Select the clear all data sets for factory reset. 

How to reset the Brother touchscreen printer?

Step 1: Unplug the power cable located in the back of the printer. 

Step 2: Press the “Settings” button

Step 3: Select “All Settings”. 

Step 4: Press the “Initial Setup” button.

Step 5: Press the “Reset” button.

Step 6: Depending on your printer’s model a “Factory Reset” or “All Settings” button will show up. Select whichever button comes. 

Step 7: A “Yes” command will pop up. Press and hold the command for 2 seconds. And the printer will be reset. 

How to factory reset a Canon printer?

Step 1: Press the “Setup” button. 

Step 2: Keep pressing the arrow key and navigate through the “device Settings”. Select “OK”. 

Step 3: Keep pressing the arrow button again until you find “Reset Settings” select the reset settings by pressing “OK”. 

Step 4: Press the “Yes” button or confirmation and the reset will be done. 

After resetting you have to set up the printer on your PC. Here’s how to do it. 

Setting up the printer in Windows. 

Step 1: Press the “Start” button and choose “Settings”. 

Step 2: Select “Devices”. 

Step 3: Locate the “Printer & Scanners” option on the left panel. 

Step 4: Click on the (+) sign to add a new printer. In Windows 11, you will see an “Add Devices” button.

Add Devices

Step 5: Select your printer’s name from the list and click “OK”. 

Method 3: Uninstalling And Reinstalling The Printer Driver

In this method of insufficient memory to load selected printer Bluebeam issue, there are four sections. 

Section 1: Removing the Printer

Step 1: Press on the windows or Start button.

Step 2: Click on “Devices” and go to the “Printers & Scanners” setting.

Step 3: you will find your printer’s name in the device lists. Click on the name and click the “Remove” button below. 

Removing the Printer

Section 2: Uninstalling the Printer Driver

Step 1: Press the “Start” button and go to “Settings”. 

Step 2: Go to the “Apps” from the left pane.

Uninstalling the Printer Driver

Step 3: Locate the printer app or name, and click on that software. 

Step 4: Select “uninstall” and press “yes” for confirmation. 

Section 3: Removing the Drive

Step 1: Go to the “Settings” option by clicking start. 

Step 2: Select “Device” and locate “Related Settings” in the right pane.

Removing the Drive

Step 3: Select the “Print Server Properties” under related settings. 

Step 4: Click the “Drivers” tab from the top middle 

Step 5: Select your Printer’s name and select the “Remove” button from the bottom. 

Step 6: Select the “Remove Driver And Package” and Select “Ok”. 

Step 7: Select “delete” to complete the process. 

Section 4: Reinstall the Printer & Driver

Step 1: Go to your printer’s manufacturer’s website and download your printer’s latest version of the driver.

Step 2: Open the driver and click install. Keep clicking “Ok” and “Agree” to complete the process.

Now check if the problem is resolved. The uninstalling and reinstalling of the driver method solve the printer installation error in your PC as well. 

Method 4: Changing The Printer Driver. Insufficient memory to load selected printer Bluebeam

If you are using an HP printer, changing the printer driver method might solve the problem. For example, if you are recently using the PCL6 driver, you can replace it with PostScript or PCL5.  

You can download all these drivers from the HP Printer driver and software. In the same method mentioned under uninstalling and reinstalling the driver, uninstall the existing driver. And then download and install the new one. 

Many HP printer users could solve the Bluebeam Revu insufficient memory to load selected printer issues with this method.

FAQs: Insufficient memory to load selected printer Bluebeam

How Do I Clear Printer Memory?

To clear the printer’s memory, you have to reset the printer. Turn on the printer and pull the power plug off. Leave it like that for at least 15 seconds until all the printer’s power is discharged. Then power it back. This will reset the printer. 

Can You Add Memory To A Printer?

You can add memory to a printer by adding additional RAM to the printer. To do this, from the “Printer’s & Devices” go to the printer properties. In the printer’s tab, you will find Printer memory. Increase the memory size to 768MB from the upper arrow button.

How Much Ram Do You Need To Run Bluebeam?

To run Bluebeam on your PC, it is recommended to have at least 8 GB of RAM. You can run Bluebeam on a PC with less RAM, but you won’t get the optimal performance. Also, 62-bit windows are recommended for Bluebeam. 

Conclusion: Insufficient memory to load selected printer Bluebeam 

Here goes all the solutions for insufficient memory to load selected printer Bluebeam problems. This article should be enough to solve the insufficient memory problem. However, if you are still facing this problem, you should consult with a professional. 

Now it’s time for me to go. See you another time!

Read also: How much printer memory do I need?

Filed Under: Printer

MAC Address Filtering Hp Printer: Troubleshooting Guide!

March 7, 2023 By mfarooq012012

Although MAC address filtering is a good security feature, it can cause problems when you try to connect your HP printer to a network. 

So, what to do with the MAC address filtering hp printer issue?

To fix the MAC address filtering issue and connect the HP printer to the network, try restoring the wireless defaults in the printer. It will resolve any error caused by this security feature. Also, connecting the printer to the network manually or through printer drivers might help. You can also disable the MAC address filtering to connect the printer. 

The discussion doesn’t end here. To understand these processes fully, you should keep reading the article. 

What Is Mac Address Filtering? 

Mac address filtering is a security feature. It is used to control which devices can access a wireless network based on their MAC addresses.

Many people confuse it with an Apple feature. But, is the MAC address only for Apple?

No, the Mac address is not only for Apple devices. MAC address stands for Media Access Control address which is a 12-digit number that is available in every wireless device.

Like other wireless devices, HP wireless printers also use this feature to secure connection between the printer and only one computer or phone. 

So, when the MAC address filtering is enabled and you try to add an old printer to a new computer, you can not connect them. MAC address filtering will block the connection. The same thing happens when you try to connect an old computer to a new printer as well.   

Sometimes, even if you don’t change the devices, the Mac address filtering can malfunction and block your printer from working. So, let’s see the troubleshooting for all of these situations. 

MAC Address Filtering HP Printer Troubleshooting 

If you can’t connect the HP printer to the network and keep getting the printout MAC address filtering, the following methods can help. Try these methods one by one until you can connect the printer through the network. 

Method 1: Restore Wireless Defaults in the printer

Let’s say you are using the same printer and computer for a long time. But sometimes, the MAC address filtering can malfunction and block the printer. In this case, you can perform the following steps. 

Step 1: On the front side of your HP printer, there is a wireless button. ( ) Press this button. 

Step 2: With the navigation arrow buttons, locate the “Restore Wireless Defaults” option and select this button. 

Step 3: Remove the power plug of the router and keep it that way for at least 30 seconds and plug it in again. This will restart the router. Now check if the MAC address filtering problem is solved or not.

Method 2: Manually Connect the printer to the Wi-Fi network

Connecting the printer manually through the network can fix the MAC address filtering error issue in your HP printer. If your network is unable to verify your printer, this method can also help with that. Follow the steps given below. 

Step 1: Make sure the printer is within your router’s range. The closer you can keep it to the router, the better. 

Step 2: Turn on your HP printer. You have to make sure there is paper loaded in the tray and the ink cartridges are attached properly. 

Step 3: Go to the “Settings” option of your HP printer and select “Network Settings” and then select  “Restore Network Settings”. 

Step 4: Go to “Wireless Settings” and choose the “Wireless Setup Wizard” system.

Wireless Setup Wizard

Step 5: Enter the SSID and password of your router. And the printer will be connected to the network. 

Method 3: Connect The Printer Through The Printer Driver

In some cases, even if the MAC address filtering is disabled, your printer may still struggle to connect to the network due to some error. In these cases turning off the WEP works, but it is highly recommended not to turn off the WEP as it’s not secure. 

Instead, you can connect the printer through the HP printer driver in the following way. 

Step 1: Access the HP printer drivers and go to the “Setup page”.

Step 2: Start the printer’s setup program and choose the “Wireless LAN” option. The program will start detecting the printer. 

Step 3: If the program can’t detect the program, connect it to your computer using a printer cable and follow the setup program’s instructions.

Step 4: Once the printer is detected, the program will automatically configure the correct wireless settings. And when the driver verifies your printer, you can remove the cable. 

Step 5: During the wireless setup process, at some point, you will need to enter the SSID of the router and its password. Make sure to enter this information correctly. 

Step 6: Test the wireless connection by searching for the HP printer on your phone or computer. Select the correct printer from the list.

Now the printer should be connected to the network. Make sure your printer driver is updated, otherwise you can face many issues with the printer. For example, your computer might be unable to install the printer. 

Method 4: Disable the MAC Address Filtering System

Disabling the MAC address filtering should help you connect the printer to the network.

How To Disable Mac Address Filtering In Windows?

To disable the MAC address filtering in Windows, follow the steps given below. 

Step 1: Press the Windows+R button together to get the Command Prompt. 

Step 2: Type “ipconfig” on the command box and hit the “Enter” button. 

Step 3: Keep scrolling down the readouts until you find the “Default Gateway” entry.

Default Gateway

Step 4: Keep note of this entry as this is your router’s address and you will need it later. 

Step 5: Open any of the browsers and go to your router’s configuration by entering your “Default Gateway”  address in your browser’s search bar. 

Step 6: Log in to your account by entering the router’s name and password. 

Step 7: Go to the “Advanced” option and locate “Access Control”, “MAC FIltering” or “WLAN MAC Filter”. If you don’t find the option under “Advanced” settings, search in the “ Security” or “Wireless Settings” option. 

Step 8: From the MAC filtering, choose the “Disable” option. Select the “Save” or “Apply” button to save your changes. And the MAC filtering will be turned off. 

How To Disable Mac Address Filtering In Mac?

Here’s the process of disabling MAC filtering in Mac. 

Step 1: Go to the “System Preferences” option from the Apple Menu. 

Step 2: Select “Network”. 

Step 3: From the left pane, select the router that is currently connected.

System Preferences

Step 4: You will see your router’s address. Keep a note of that number.

router’s address

Step 5: Go to any of your browsers and feed the router’s address into the address bar. 

Step 6: After that, follow the same steps as Windows. 

And don’t worry about the security of your printer after disabling the MAC address filtering. You can still secure your wireless printer in other ways. 

Method 5: Use a Cable

When you have tried all the methods and still have no success, you have to take the printer to the dealer. There can be some internal wireless connectivity issues in the printer which you can’t fix alone.  

Meanwhile, if you have to print something emergency, use a compatible USB cable to connect the printer directly to the computer. 

Frequently Asked Questions (FAQs):

Where Is The Mac Address On My Hp Printer?

To find the MAC address on your HP printer, connect the printer to a network. Then go to the network menu on the printer’s display. From there, you should be able to find the MAC address listed as a series of numbers and letters. Sometimes, the address is mentioned at the bottom of your HP printer. 

Is Mac Filtering Important?

Technically, MAC filtering is not that important. This feature can provide an additional layer of security initially. However, it is not a foolproof solution as hackers can easily hack into this feature. Also, it causes many errors in the wireless devices’ connection. 

How Do I Fix My Printer If It’s Not Connecting To Wi-Fi?

To connect the printer to Wi-Fi, keep the printer close to the router. Restart both the printer and the router. Make sure the firmware of your printer is updated and the Wi-Fi password entered on the printer is correct. Disable any firewalls or security software temporarily including MAC filtering and check if the network connects. 

Conclusion 

Here goes my take on the MAC address filtering hp printer issue. I hope this article covered everything you had to know about mac address filtering and what to do when this problem occurs on your HP printer.  

That’s all for now. All the best with your printer and have a great day!

Filed Under: Printer

  • « Go to Previous Page
  • Go to page 1
  • Go to page 2
  • Go to page 3
  • Go to page 4
  • Go to page 5
  • Interim pages omitted …
  • Go to page 8
  • Go to Next Page »

Search

About US

Welcome to A Printer Tech! We are a team of passionate individuals who believe that printing should be easy, convenient, and affordable for everyone. Our mission is to provide high-quality printing services that meet the unique needs of our customers, whether they are individuals, businesses, or organizations.. Read more about us.

Categories

DMCA.com Protection Status

Most Popular

  • Why is my Canon printer printing blank pages: your best guide
  • Solving Windows cannot connect to the printer access is denied error
  • How to reset Epson printer to factory settings: Q&A
  • Ender 3 v2 Firmware Not Updating- Find & Fix!
  • Octoprint vs Klipper: Which One to Pick?
  • VzBot vs Voron: 7 Significant Differences!
  • PETG Layer Adhesion: How To Improve It?
  • Home
  • About Us
  • Terms of Services
  • Disclaimer
  • Contact Us

COPYRIGHT © 2022 · APRINTERTECH.COM, ALL RIGHTS RESERVED.